
This lesson is all about learning to create your own blog on WordPress. Starting a blog is easy – believe me – if I can do it, anyone can master this! I am not what you would call a “tech savvy” person, so don’t assume I am guiding you with a ton of coding or web development knowledge behind me! I learned as I went through trial and error, and can now troubleshoot almost any issue I am having.
You can start a blog for a variety of reasons, but for the purpose of this lesson, we will talk about starting a blog for business. Even if you are starting a blog for pure enjoyment, you should plan it out like a business. After all, wouldn’t it be great to make enough money to earn a living when you are talking about something you love? You will hear about how one expert blogger makes over $50,000 a month from affiliate links on her blog. That isn’t her only stream of income from the blog, either!
Below I have included discount pricing for Bluehost, the hosting service I use, so you can start a blog at a very reasonable price. This is a promotional price, however, so now is the time to grab your domain while the price is so low!
Just click here to start the blog on WordPress, then follow these easy instructions to set yours up!
Starting a blog with Bluehost is a quick and reasonable option, and can stand alone, or be linked to any website with ease. I personally use Bluehost to host my blog. I have used GoDaddy in the past for other sites, and am much more satisfied with Bluehost as an option. They are simple and are “no frills”. I don’t feel like I am being forced into buying other services or products, with every-rising prices like I was with GoDaddy. They do offer options, such as plug-and-play website building, but trust me when I tell you that you pay for it!
An individual or a business can set up (and make money) with a blog, and you will earn back your initial investment very quickly, since the price is so low right now!
I am definitely not alone: Bluehost has been named one of the top web hosting companies in 2017, and you can start your own blog with them for as low as $3.95 a month (see what I mean about low prices?). If you sign up with my link, you get your domain for free if you purchase a 12 month or longer hosting plan. I recommend this plan, as you can save money by signing up for at least 12 months. 36 months is the best pricing, but it all depends on what you are comfortable committing to.
Click here to sign up for me Starting a Blog for Business (Or Just for Yourself) FREE Email Course.
If you have done any research on blogs, you may be wondering why you shouldn’t just set up a free blog on Blogger/Blogspot, or through WordPress.com. This sounds like a reasonable option, but I will explain why you need a self-hosted blog on a site like Bluehost.
We have been discussing how to Blog for Business – and the purpose of Blogging for Business is to make money. Even if you are blogging for fun, you may eventually want to become a consultant, or turn it into a business, so the wise decision is to start off on the right platform – Bluehost! You are self-hosted, which means you can run your own advertisements, affiliate links, banners, or whatever you want with Bluehost, because YOU control the content. Many companies or advertisers avoid the free platforms because they don’t see them as professional. Even if you are blogging as a hobby, you still want to be taken seriously, so a professional-grade blog is the right way to go.
Many extremely successful bloggers swear by self-hosted WordPress blogs, such as Michelle Schroeder-Gardner. Take a look at her blog, Making Sense of Cents, here. She explains how she started off on a free blog site, then switched over to a self-hosted WordPress blog. Only then did she start making money! If you check out any of her income reports, which she is kind enough to share, you will see that the money is substantial! I will explain more about her course, Making Sense of Affiliate Marketing later in this post.
To recap on why you should consider a blog on WordPress, I’ll give you a quick rundown of my main reasons:
- WordPress through Bluehost is FREE
- You will be self-hosted. I know I have mentioned that several times, but if you are looking at blogging as a supplement to (or your main business), it has to have the ability to be monetized.
- You will appear more professional and be taken seriously by both readers and advertisers
- You get a free domain if you sign up for 12 months
- The only service you are paying for through Bluehost is the monthly web hosting, which for a limited time is as little as $3.95 per month
- Bluehost is straight forward and simple – no gimmicks, or pressure to use their services for everything else
- Bluehost offers a guarantee if you determine it is not for you. If you get stuck, I can always help walk you through. Just email me (email is on my site).
- They also have great customer support. I can say from previous experience that this is NOT the case for all web hosting companies!
Web hosting companies are NOT created equal! I have had a website for 9 years with my business. I wish I had known about Bluehost all along, as I have experienced so many technical issues, bad customer service situations, and lack of response. When I started my blog, I did my homework. I narrowed it down to a few, but ultimately went with Bluehost because of the value for the services they provide. I couldn’t be happier!
Once you choose your hosting service, let’s get started!
1. Register a Domain Name
The first step you need to think about when starting a blog is the domain name. If you are a business owner and have a domain already, the name will not be as critical, as you will be linking it to a menu on your existing site. You may be able to get the same domain name, but with a different ending like .net, .co, .biz, .us, etc.
If you are just starting a blog from scratch, choosing your domain is much more important! It should be easy to spell and navigate, and can be your business name, or a version of it. Let’s say your business is Smith and Associates. Since that name is common, chances are that domain will be taken. You can try names such as S&A.com or .net, JohnAllenSmith.com or .net (a full name), or Smith-Engineers.com, emphasizing what you do. The possibilities are endless, but take it from me – try to make it as simple as possible!
When I started my original company, Resilience Group, LLC, I didn’t take the complexity of the word into consideration. To this day, I sometimes don’t receive emails because someone messed up spelling @resiliencegroup.net. The smarter move would have been @rsgroup.net or @rsg.net. I have also purchased all of the obvious misspellings for “resilience” so that I can catch any emails I might miss (most of the time).
So take it from me – the simpler, the better.
2. Buy the Hosting
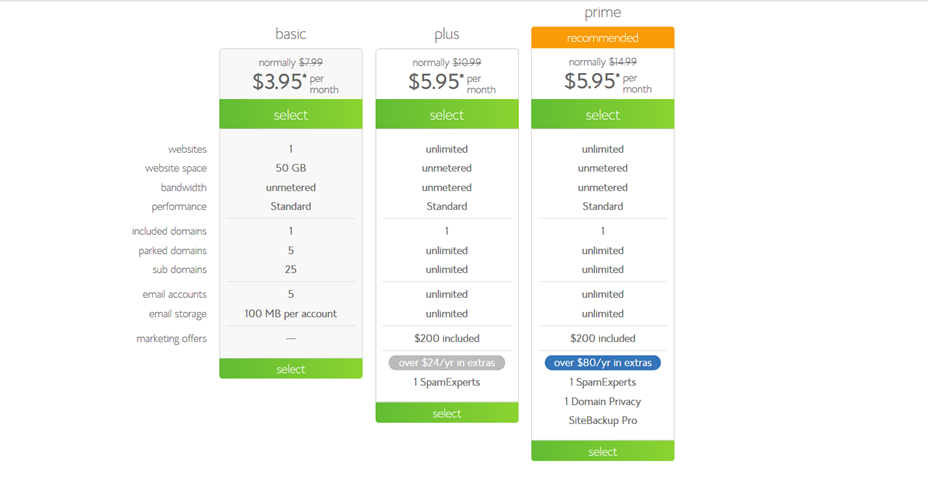
Bluehost Pricing
As you can see, I wasn’t kidding when I said that the price was inexpensive! Just to give you an idea of the basic differences, I am going to show you a pricing sheet for another hosting company. Your pricing starts at your domain characters and varies depending on the letters your domain ends in. As an example, I typed in start a blog on GoDaddy.com below. This does NOT include the hosting, or any of the other features that Bluehost does.
- I will also point out that to get started, you will only need the basic plan for your blog. That plan is $3.95 a month through my link. They will charge you up front for the plan, just as an FYI. The shorter the duration you go with, the more your monthly fee will amount to, but only by $1-2 dollars a month. The best value is by purchasing a 36-month plan. There is a 30-day guarantee if you decide it is not for you.
- If you start to put a lot of content on your blog, you can always upgrade to the plus or prime plan, but my opinion is that you do not need them to get started.
- You will not need any of the extras right now, so feel free to uncheck any other offering. It is as simple as that with Bluehost. Other plans automatically include other services, that start billing you after 30 days if you don’t cancel them.
- You can always sign up for month to month through Bluehost, but you will not get the free domain, and you always run the risk of losing functionality of your blog if your card doesn’t process, which can mean less traffic and $$$ when you choose the month to month option. Hosting will cost you an average of about $72/year, so it is a minimal upfront investment to secure access to your site.
When you follow my link on Bluehost, you will click on the Get Started Now button.
- Select the package you are interested in
- Sign up for a domain name – my advice is to get your domain through Bluehost. It will be more cost effective and make it much easier in the long run. If you purchased a domain through another provider, click here for additional instructions.
- Enter your payment information
Create a password and store it on paper in a safe spot. It is very important to create a secure password, so don’t use a password you use for everything else.
3. Install WordPress on Bluehost
Okay – it’s time to install WordPress on your Bluehost site! You will be directed to a screen that looks like this:
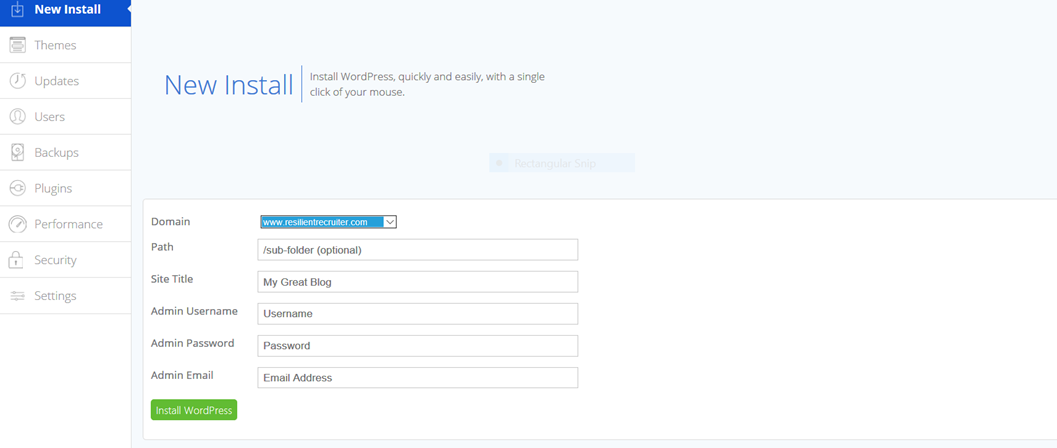
Bluehost WordPress Installation Template
This part is very simple – literally one step – and it’s free!
You can either do this through your welcome email, or go right back into the Bluehost site (as seen above).
- If you are going through your welcome email, click the image that says “One Click Install”
- Click on the WordPress icon on the next page under “blogs”
- Click on the start button and this will begin installation.
- When you begin the installation process, you will decide which domain you want to install WordPress on (see mine above). Click your choice in the dropdown.
- In advanced options, you will be able to enter your user name and password. Again, choose a secure and unique user name – one that you don’t use for everything else – and a unique password. Write them down on paper as well. You never know when something will happen to your computer and you need to access your blog from another device!
- Check the box that says “automatically create new database for this installation”.
- Click “install now”
- Did you save your username and password somewhere safe? Just a reminder
- BOOM – you have a WordPress blog!
You will have to work on the design, creating quality, relevant content for your readers, but you have the first part done!
When working in WordPress:
- Save your login information in a safe place, but you may also create a shortcut in your favorites bar to get to your dashboard. I keep myself logged in to my WordPress account for quick edits, but only do that if you are the only one using that computer, and always have it in a safe place.
- The next step will be the design of your blog. You will need to choose a theme. Under “Appearance”, you can select “theme”. You will have the choice of going with a popular theme, or you can browse through others and select the one that appeals to you. Genesis is a popular them among bloggers, but I use the Zerif Pro theme through ThemeIsle. It was the theme that was most appealing to me at the time, and I went with it. I experimented with a couple others themes before I settled with Zerif, so you will have to see what works for you. There is a free version of most themes, or you can upgrade to a paid theme for greater functionality. I have more than one blog, so I went with one of each just to try them. To be honest, my free theme does everything I need it to! You can check out ThemeIsle themes here if you are interested.
-
You can create posts two ways. One is on the back end in the dashboard under “posts” – see below

WordPress Dashboard Example
- The other is through Microsoft Word (if you are working with a PC). You can enter your blog’s information and have the luxury of saving a copy in Word format on your computer, as well as publishing it.

Microsoft Word Blog Template
- If you want to add a new page, simple click on “Pages” (see above picture).
- Adding images to your site will require you to click on the “Media” selection (see above picture as well). You can add media from a file on your computer, or you can add pictures from your website, once you have amassed a few on your dashboard.
- You can go to “Appearance”, then “widgets” to add items to your sidebar, footer, and so on.
- If you would like to send newsletters to or group emails to your readers, you have a couple of options. I use ConvertKit, as I have a larger mailing list that I have used for my business. It offers a ton of options and you can segment subscribers, and tag certain users. It’s fantastic, but not a necessity from day #1. To get started, and before you build your email list, you can use a free service like Mailchimp. Mailchimp offers a great deal of functionality at their free level. Once you have an established list, you will be required to upgrade, even on MailChimp. At this point, I would switch to ConvertKit. Just be sure to save screenshots of your confirmed subscribers through your original list. ConvertKit will want proof that this list is legitimate and you are not spamming people! Your LinkedIn connections do NOT count as confirmed subscribers until they sign up for your blog.
- To start monetizing your blog, I recommend Michelle Schroeder-Gardner’s course Making Sense of Affiliate Marketing. If you recall, she is the blogger I mentioned earlier that is making serious cash through her affiliate marketing links and her blog Making Sense of Cents. She’s the real deal and someone ANY blogger could learn a TON from! She has been doing this since 2011 and takes you on her journey through learning the ins and outs of blogging. You will find a ton of useful information on her blog, so I suggest you check it out for reference!
That’s all for now, but do not hesitate to reach out with questions or concerns as you set up your blog for the first time. This is the beginning of a long and rewarding journey. Stay tuned for other articles to assist you in your blogging and business efforts!


Natalie Lemons is the President of the Resilience Group, LLC, the author of The Resilient Recruiter, and co-founder of Need a New Gig. Please follow her blog for more articles like this, plus helpful free downloads for leaders and business owners.
Navigate YOUR Career Path!
Get in on our newsletters, FREE products and content to make your job easier!